Tracker 8
With Tracker 8, field, warehouse and office personnel can use a smart phone, tablet or computer to find and order the tools, equipment and supplies they need. No installation is required (unless you want to read QR or barcodes with a smart phone): your data lives in the cloud and the interface runs on any device with a modern browser.
Tracker 8 was designed for mid-sized to large construction companies that want to assign tools and equipment to jobs, employees, trucks and storage sites. Report customization and QR and barcoding (with phone and tablet cameras, stationary and portable barcode readers) are built into the system.
- Smart phones and tablets can read QR and barcodes with stationary barcode readers or, with the right software, their cameras.
- Stationary barcode readers, which are attached to a computer, smart phone or tablet via cable, radio or bluetooth, are less expensive than portable readers. Attached to a computer, they work well if everything in your warehouse passes through a single door or across a single counter. Attached to a smart phone or tablet, they're portable but you have to deal with 2 pieces of hardware. Many different stationary readers can be used with Tracker 8. With computers, we recommend the stationary reader pictured below. The bluetooth scanners we recommend with smart phones and tablets are similar.
- If you need to collect large amounts of data while away from your computer, battery-powered, portable barcode readers can scan items as they’re loaded or unloaded from a truck or delivered to a job site. The portable reader pictured below has been programmed to work with Tracker 8. Others could be used, but custom programming would be required.
- QR and barcode label software is integrated with Tracker 8. You can print your labels in-house or use pre-printed labels.


Optional, extra-cost modules can be added to Tracker 8) at any time, without re-entering data.
Supplies and Small Tools. Track less-expensive items like hand tools and supplies. Kits, containers, and order points.
Billing. Tool management software that turns your tool room into a profit center. Automatically processes tool and equipment sale and rental rates as items are checked out, including job discounts and rental caps.
Repair and Maintenance. Track repair histories and costs, set up preventive maintenance schedules that alert you when maintenance is due.
Multi-user. Allows more than one person to run Tracker 8 at the same time. Differentiates between editing and view-only users. Editing users can add and edit data. View-only users can find and order items but cannot otherwise add or edit data.
For a quick introduction, read the Overview or one of the intros to Tracker 8 on this page.
For more depth, click Tracker 8 help in the main menu to explore the Tracker 8 help system.
Or contact us if you ...
- Would like to schedule a live, over-the-internet demonstration.
- Want to try Tracker 8 'live' (we'll give you a temporary demo account).
- Have questions. Tracker 8 is very flexible and offers lots of options. We can quickly steer you in the right direction.
SIGN INTO TRACKER 8
After you sign up (or your organization signs you up) for Tracker 8, you'll receive an email with sign-in instructions. You don't need to install anything (unless you want to read barcodes with a smart phone).
THE MAIN MENU
After you sign in, the main menu looks like this on a smart phone or tablet (it looks slightly-different on a computer).
![]()
- Find and add to cart
- Fast add to cart
- Cart
- Data
- Utilities
- Help
- (on a computer) (on a smart phone or tablet) Sign out
Touch one of these links and its help page will open.
You may not see all these icons and choices in your copy of Tracker 8. What you see depends on the rights assigned to you by your organization's Tracker manager and the Tracker options your organization has selected.
FIND ITEMS
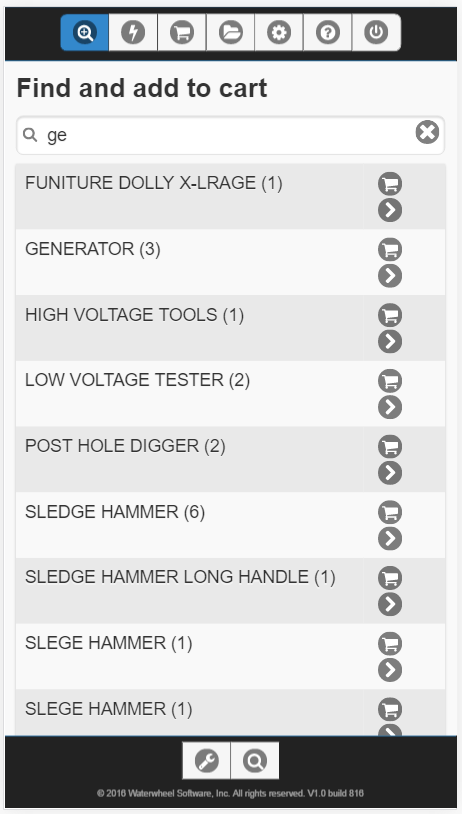
Touch the Find and add to cart icon in the main menu to open the find and add to cart screen.

If a search window appears, fill it in and touch OK. The search window appeared because an optional default search was set up for your copy of Tracker 8, a search that runs whenever the find and add to cart screen is opened. You can change or get rid of this default search (see searches).
Scroll through the list or search for the items you want. If you have a lot of data, it will be spread across pages: in the picture above, 3/7 (near the top, to the right of 'Find and add to cart') means that you have 7 pages of data and page 3 is currently displayed. Touch the icons at the bottom to navigate: takes you to the first page, the previous page, the next page and the last page.
Search (or refine the default search) by typing in the Search descriptions field, for example, descriptions that contain the letters 'ge'.
LEVELS
Your data is presented in 3 levels. Usually, the top-most level displays your organization's descriptions and the quantities of each. Drill down to the next level (which displays a description's current assignments) by touching to the right of a description. In the example below, all 3 generators are assigned to the default storage site.
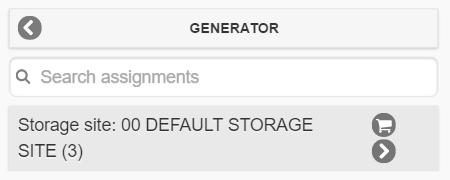
Touch at the top left to return to the previous screen, to drill down to the next level (the specific items with the previously-selected description that are currently at the assignment you select).
GROUPING
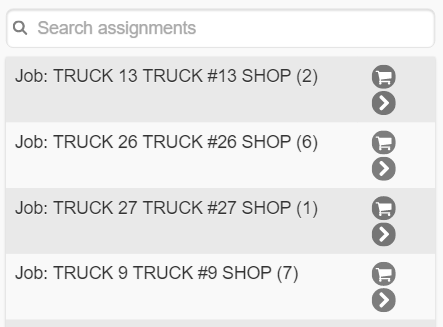
We've been looking at data grouped by description then assignment, which is ideal if you want to know where your generators are. If you want to see a list of items at a job, touch the tool icon in the menu at the bottom of the screen then Group by assignment then description.

Now assignments (which can be jobs, employees or storage sites) are at the top level.
Drill down to the next level to see the descriptions currently at an assignment (in this case, the descriptions assigned to truck 26).
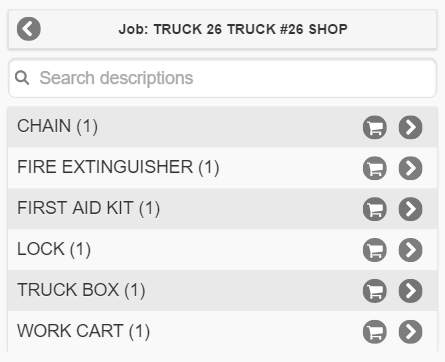
Drill down again to see the specific items assigned to truck 26.
ORDER ITEMS
Ordering items in Tracker 8 is like ordering from an online store: you find the items you want, add them to your cart then place your order.
You can add items to your cart from several screens, but we'll continue looking at the find and add to cart screen.
To add an item to your cart, touch the cart icon to its right.
You can add as many items to your cart as you like. When you want to see the contents of your cart, touch the cart icon in the main menu.
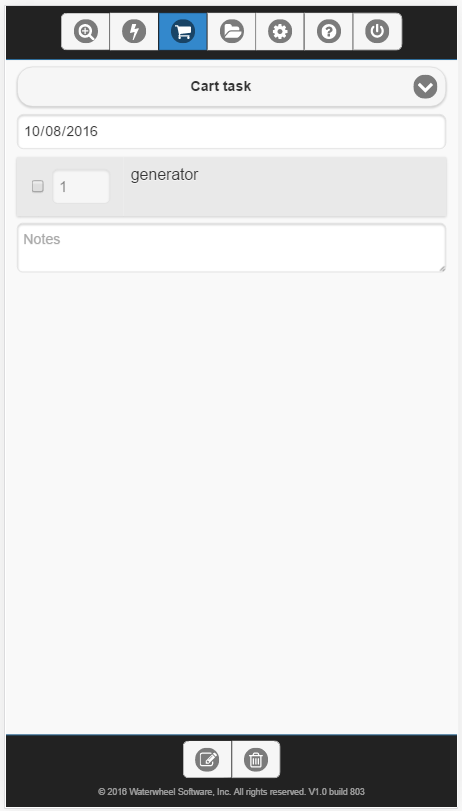
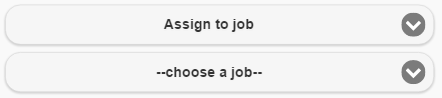
Touch Cart task and pick a task, for example, Assign to job.
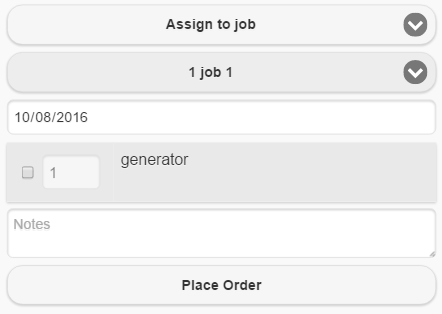
Another button will appear, prompting you to enter the assignment (a job, in this case) you're ordering for.
Touch Place Order at the bottom to record your order.
If you see Actions instead of Place Order, touch Actions and a menu will appear with 2 choices: Place Order or Ship. Place Order means someone else will fulfill the order. Ship means you're fulfilling the order yourself, if, for example, you're a foreman sending items from one job to another.
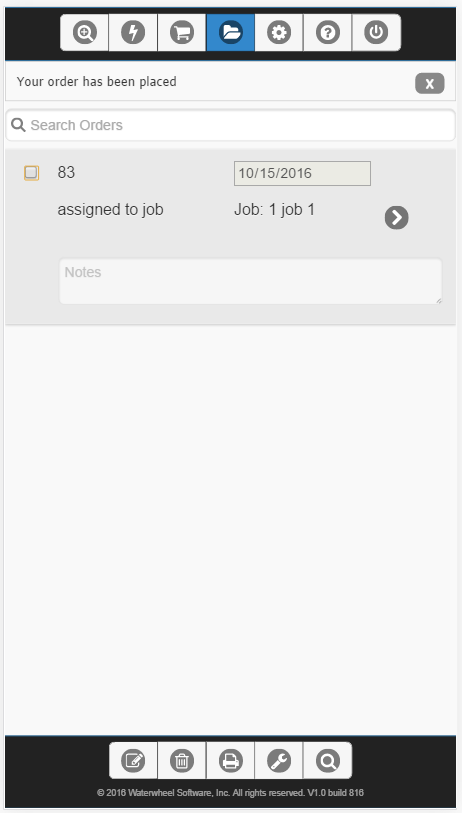
After you place or ship an order, the Orders screen opens. You can return to the Orders screen later (to check, for example, your order's status) by clicking the Data icon in the main menu then Orders.
SIGN INTO TRACKER 8
After you sign up (or your organization signs you up) for Tracker 8, you'll receive an email with sign-in instructions. You don't need to install anything (unless you want to read barcodes with a smart phone).
THE MAIN MENU
After you sign in, the main menu looks like this on a computer (it looks slightly-different on a smart phone or tablet).
![]()
- Find and add to cart
- Fast add to cart
- Cart
- Data
- Utilities
- Help
- Sign out
Click one of these links and its help page will open.
You may not see all these icons and choices in your copy of Tracker 8. What you see depends on the rights assigned to you by your organization's Tracker manager and the Tracker options your organization has selected.
ADD, EDIT AND DELETE JOBS AND STORAGE SITES
Click the Data icon in the main menu then Jobs. If none are listed, follow the directions below to add one or more. Do the same in the Storage sites screen (which is also in the Data menu).
To add a job or storage site, click the Add icon in the grid menu in the upper right corner of the Jobs or Sites grid.

To edit, click the Edit icon. If you click in the record or the field in the record you want to edit first, the cursor will appear in that record or field.
After you click the Add or Edit icon, the grid menu changes.
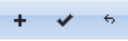
Click the Add icon to add another record, the Save icon to save, the Cancel icon to undo any changes you've made since your last save.
Clicking the Add or the Edit icon puts you in editing mode. Once in editing mode, you can add or edit as many records as you like before saving or cancelling.
To delete, select the record(s) you want to delete by clicking the checkbox(es) in the left-hand margin of the grid (you can select more than one) then click the Delete icon in the grid menu.
ADD ITEMS
Click the Data icon in the main menu then Items (which is what Tracker 8 calls the stuff you're tracking: your tools, equipment, supplies, computers, office furniture, etc.). This is the screen you'll use to add, edit and delete items. If none are listed, follow the directions below to add one or more.
While you can use the Add icon in the grid menu to add items, it's faster and easier to add them with the NEW ITEM WIZARD or DUPLICATE ITEM WIZARD.
- If you want to duplicate an existing item, select it in the Items grid then click the Tools icon in the grid menu, Macros then Duplicate item wizard.
- If you want to add a completely-new item, click the Tools icon in the grid menu, Macros then New item wizard.
- Follow the prompts. Your data isn't saved until you click Save in the last screen.
SEARCH FOR ITEMS
- Click the Search icon in the Items grid menu.
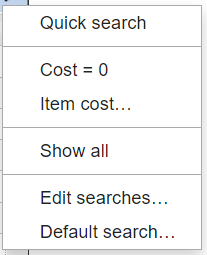
- A Quick search looks at the values in one field at a time. You can create or run more-complicated searches like Cost = 0 and Item cost ... (click searches for more information). For now, click Quick search.

- Select, in the left-most dropdown, the field you want to search. Calculated fields, which are calculated from the values in other fields, can't be quick searched and aren't listed.
- Select, in the second dropdown, the comparison you want.
- In the third field, enter the data you're looking for.
- Press Enter on your keyboard or click Search.
- Click Clear to undo the search, Cancel to undo the search and remove the quick search row.
ASSIGN ITEMS TO JOBS, STORAGE SITES, etc.
Assigning items in Tracker 8 is like ordering from an online store: you find the items you want, add them to your cart then place or ship your order.
You can add items to your cart from several screens, including Find and add to cart and Fast add to cart. The instructions here use the Item assignments screen (which lists your items' current locations).
- Click the Data icon in the main menu then Item assignments.
- Search for or scroll to the item you want to re-assign and click the cart icon to its right to add it to your cart. Do the same for any additional items you want to add to your cart.
- To examine the contents of your cart or place your order, click the Cart icon in the main menu.
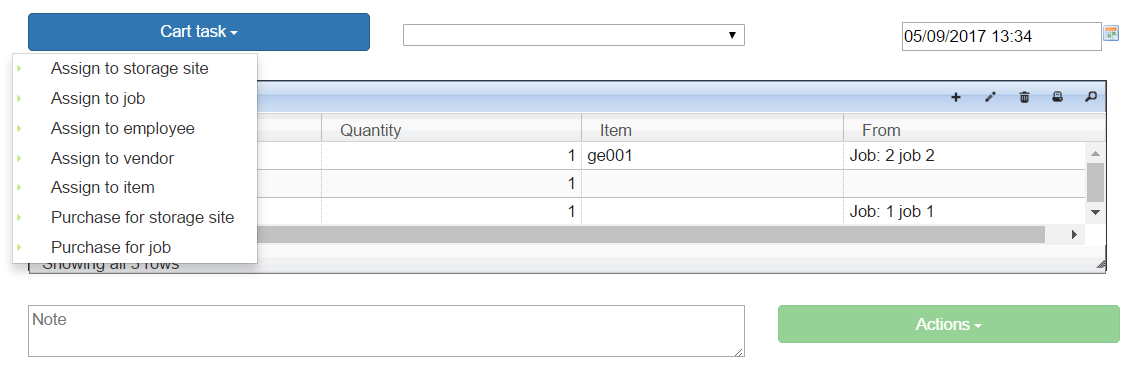
- Click Cart task and pick a task, for example, Assign to job if you want to assign items to a job (the options in the task list are described in Orders).

- Cart task changes to Assign to job and the dropdown to its right changes to --choose a job--. Click on the job you want. Depending on the options your organization manager has selected, you may see another optional or required dropdown for codes, employees or sub locations.
- The date in the upper right corner defaults to today but can be edited. It will be saved as the EXPECTED COMMENCE date in the Orders screen.
- Add items to, edit items in or delete items from the grid, for example, changing the quantity ordered (click the Edit icon in the grid menu to edit).
- If you enter a note in the lower left, it will appear in NOTES in the Orders grid.
- If you see a Place Order button at the bottom right, click it to record your order. If you see Actions, click it and a menu with 2 choices (Place Order and Ship) will appear.
- Placing an order in Tracker 8 is like ordering from an online merchant, who packs and ships your order. Shipping means you're moving items (you might be a warehouseman picking items for a job or a foreman sending items from one job to another). You'll probably select Ship, most of the time.
- After you place or ship an order, the Orders screen opens. You can return to the Orders screen later (to check, for example, your order's status) by clicking the Data icon in the main menu then Orders - assignments.
RUN A REPORT THAT LISTS THE ITEMS CURRENTLY AT A JOB
- In the Item assignments screen, run a quick search for the job you want.
- Click the Reports icon in the grid menu.
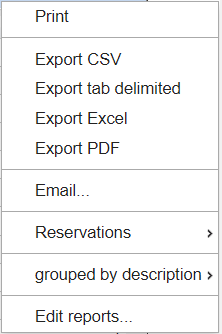
- This menu is for a screen with 1 grid (if your screen has 2, the menu will list both). The first 6 choices (through Email) are all for the same report (the other options are described in reports).
- Click Print. The report will appear in a window, from which it can be printed, and will include the columns currently displayed on your screen.
CUSTOMIZE YOUR TRACKER 8 GRIDS AND REPORTS
Tracker 8 grids can be customized. And what you see on your screen is what you'll see in most reports, so customizing one customizes the other.
If you'd like to customize your grids, read about views or contact us and we'll show you how.
MAKE ITEM ASSIGNMENTS YOUR DEFAULT SCREEN
If you'd like the Item assignments screen to appear when you first open Tracker 8, make it your default screen.
- Click the Utilities icon in the main menu then Preferences (if you see more than one tab, click User Preferences).
- Click the drop-down to the right of Default screen, Item assignments then Save.

SIGN INTO TRACKER 8
After you sign up (or your organization signs you up) for Tracker 8, you'll receive an email with sign-in instructions. You don't need to install anything (unless you want to read barcodes with a smart phone).
THE MAIN MENU
After you sign in, the main menu looks like this on a computer (it looks slightly-different on a smart phone or tablet).
![]()
- Find and add to cart
- Fast add to cart
- Cart
- Data
- Utilities
- Help
- Sign out
Click one of these links and its help page will open.
You may not see all these icons and choices in your copy of Tracker 8. What you see depends on the rights assigned to you by your organization's Tracker manager and the Tracker options your organization has selected.
ADD, EDIT AND DELETE JOBS AND STORAGE SITES
Click the Data icon in the main menu then Jobs. If none are listed, follow the directions below to add one or more. Do the same in the Storage sites screen (which is also in the Data menu).
To add a job or storage site, click the Add icon in the grid menu in the upper right corner of the Jobs or Sites grid.
To edit, click the Edit icon. If you click in the record or the field in the record you want to edit first, the cursor will appear in that record or field.
After you click the Add or Edit icon, the grid menu changes.
Click the Add icon to add another record, the Save icon to save, the Cancel icon to undo any changes you've made since your last save.
Clicking the Add or the Edit icon puts you in editing mode. Once in editing mode, you can add or edit as many records as you like before saving or cancelling. This is a big improvement over Tracker 7, where you must save a new or edited record before adding or editing another.
To delete, select the record(s) you want to delete by clicking the checkbox(es) in the left-hand margin of the grid (you can select more than one) then click the Delete icon in the grid menu. The ability to delete more than 1 record at a time is another big improvement over Tracker 7, where records can only be deleted one by one.
ADD ITEMS
Click the Data icon in the main menu then Items (called Inventory in Tracker 7: your tools, equipment, supplies, computers, office furniture, etc.). This is the screen you'll use to add, edit and delete items. If none are listed, follow the directions below to add one or more.
While you can use the Add icon in the grid menu to add items, it's faster and easier to add them with the NEW ITEM WIZARD or DUPLICATE ITEM WIZARD.
- If you want to duplicate an existing item, select it in the Items grid then click the Tools icon in the grid menu, Macros then Duplicate item wizard.
- If you want to add a completely-new item, click the Tools icon in the grid menu, Macros then New item wizard.
- Follow the prompts. Your data isn't saved until you click Save in the last screen.
SEARCH FOR ITEMS
- Click the Search icon in the Items grid menu.
- A Quick search looks at the values in one field at a time (like Tracker 7's simple begins-with or equals search). You can create or run more-complicated searches like Cost = 0 and Item cost ... (click searches for more information). For now, click Quick search.
- Select, in the left-most dropdown, the field you want to search. Calculated fields, which are calculated from the values in other fields, can't be searched and aren't listed.
- Unlike Tracker 7's simple begins-with or equals search, Tracker 8's quick search allows you to choose a comparison (like contains or greater than). Select, in the second dropdown, the comparison you want.
- In the third field, enter the data you're looking for.
- Press Enter on your keyboard or click Search.
- Click Clear to undo the search, Cancel to undo the search and remove the quick search row.
ASSIGN ITEMS TO JOBS, STORAGE SITES, etc.
Assigning items in Tracker 8 is like ordering from an online store: you find the items you want, add them to your cart then place or ship your order.
You can add items to your cart from several different order entry screens:
- Find and add to cart was designed for field people who use the Tracker occasionally but aren't real familiar with their organization's item numbers and descriptions.
- Fast add to cart is for warehouse people who use the Tracker often and are familiar with their organization's item numbers and descriptions. Most Tracker 7 users do. They know that, when they type a few characters into the order entry screen, Tracker 7 will display all the items whose item numbers start with those characters. Tracker 8 goes further and displays all the items whose item numbers or descriptions contain those characters.
- That said, many Tracker 7 users have asked for the ability to order from the Inventory screen. That's why we'll look here at ordering from Tracker 8's Item assignments screen which, like Tracker 7's Inventory screen, lists your items' current locations.
- Click the Data icon in the main menu then Item assignments.
- Search for or scroll to the item you want to re-assign and click the cart icon to its right to add it to your cart. Do the same for any additional items you want to add to your cart.
- To examine the contents of your cart or place your order, click the Cart icon in the main menu.
- Click Cart task and pick a task, for example, Assign to job if you want to assign items to a job (the options in the task list are described in Orders).
- Cart task changes to Assign to job and the dropdown to its right changes to --choose a job--. Click on the job you want. Depending on the options your organization manager has selected, you may see another optional or required dropdown for codes, employees or sub locations.
- The date in the upper right corner defaults to today but can be edited. It will be saved as the EXPECTED COMMENCE date in the Orders screen.
- Add items to, edit items in or delete items from the grid, for example, changing the quantity ordered (click the Edit icon in the grid menu to edit).
- If you enter a note in the lower left, it will appear in NOTES in the Orders grid.
- If you see a Place Order button at the bottom right, click it to record your order. If you see Actions, click it and a menu with 2 choices (Place Order and Ship) will appear.
- Placing an order in Tracker 8 is like ordering from an online merchant, who packs and ships your order. Shipping means you're moving items (you might be a warehouseman picking items for a job or a foreman sending items from one job to another). Most Tracker 7 users, after upgrading to Tracker 8, will probably select Ship, most of the time.
- After you place or ship an order, the Orders screen opens. You can return to the Orders screen later (to check, for example, your order's status) by clicking the Data icon in the main menu then Orders - assignments.
RUN A REPORT THAT LISTS THE ITEMS CURRENTLY AT A JOB
- In the Item assignments screen, run a quick search for the job you want.
- Click the Reports icon in the grid menu.
- This menu is for a screen with 1 grid (if your screen has 2, the menu will list both). The first 6 choices (through Email) are all for the same report (the other options are described in reports). Unlike Tracker 7, you can specify the export format you want (CSV, tab delimited, Excel or PDF) and email reports from the system (in Tracker 7, you have to 'print' them as a PDF then email them manually).
- Click Print. The report will appear in a window, from which it can be printed, and will include the columns currently displayed on your screen.
MAKE YOUR TRACKER 8 GRIDS AND REPORTS LOOK LIKE YOUR TRACKER 7 GRIDS AND REPORTS
Tracker 7 grids can be customized in limited ways. Tracker 8 extends those capabilities dramatically: among other things, you can create as many Views of a particular screen as you want, each containing different data.
In Tracker 7, screens and reports are separate. Customizing one has no effect on the other (which is why people often ask for simple changes to reports, for example, adding a column). In Tracker 8, what you see on your screen is what you'll see in your reports: the same columns, sort and search results. So customizing a screen and manipulating the data in it (for example, by sorting it) automatically creates a customized report.
If you'd like to customize your grids, read about views or contact us and we'll show you how.
MAKE ITEM ASSIGNMENTS YOUR DEFAULT SCREEN
Tracker 8 offers a large number of preferences you can use to tailor the system to your needs. For example, if you're going to use the Item assignments screen more than any other, you can make it the screen that appears when you first sign into Tracker 8.
- Click the Utilities icon in the main menu then Preferences (if you see more than one tab, click User Preferences).
- Click the drop-down to the right of Default screen, Item assignments then Save.
UPGRADING IS REASONABLY-EASY
- Tracker 8 will feel familiar to Tracker 7 users. The concepts and interfaces are similar.
- Some Tracker 7 users (for example, those who inherited a poorly-maintained system) choose to re-enter their data in Tracker 8. But most ask us to convert their Tracker 7 data for them. Unless that data is non-standard or unusually-complicated, we can convert it quickly (see UPGRADE PRICING below for details).
- Tracker 7 barcode scanners will continue working with Tracker 8.
Tell us you're ready to upgrade and, we'll email sign-in instructions. You don't need to install anything (unless you want to read barcodes with a smart phone).
THERE'S NO RUSH
- Waterwheel plans to support Tracker 7 thru at least December 31, 2024 (but cannot guarantee that Tracker 7 will run on new versions of Windows and/or new generations of computer and network hardware and software).
- Tracker 8's core has been well-tested (one customer has used it for real since July 2016, a second since January 2017), and we've been adding customers slowly since then. But we're still adding features, some of which are new or nearly-new.
UPGRADE PRICING
- If you're currently paying Tracker 7 software maintenance and support fees, you may upgrade to Tracker 8 whenever you like at no extra cost.
- We charge $150 per hour for data conversion and/or Tracker 8 training.
- If you're not currently paying Tracker 7 software maintenance and technical support fees, you need to begin paying those fees before upgrading to Tracker 8 or a more-recent version of Tracker 7.
- If you keep your current Tracker configuration, Waterwheel will continue charging the Tracker 7 support and maintenance fee you're paying now thru at least December 31, 2024, whether you upgrade to Tracker 8 or stay with Tracker 7.
- If you add to your Tracker configuration while or after upgrading, we'll add (with one exception) Tracker 7 license and support fees for any Tracker 8 modules you add.
- The exception is view-only licenses, which are much-more capable in Tracker 8 than in Tracker 7. If you licensed the Tracker 7 employees module, we'll include, at no extra charge, 1 Tracker 8 view-only license for every concurrent user you licensed in Tracker 7. Otherwise, we'll charge the view-only user fees in the Price list on this web page.
- Waterwheel no longer licenses Tracker 7 Lite and doesn't plan to offer a Lite version of Tracker 8. Tracker 7 Lite customers who wish to upgrade to Tracker 8 need to upgrade to a paid version of Tracker 7 first.
- Updated August 19, 2023, subject to change without notice
IF YOU WANT US TO CONVERT YOUR TRACKER 7 DATA
You can cut over from Tracker 7 to 8 with or without an interim period. If with an interim, you can work with a blank copy of Tracker 8 or we can convert your Tracker 7 data twice, first for the interim then again when you're ready to go live with Tracker 8.
We've written a program that identifies issues that must be addressed before Tracker 7 data can be upgraded. Click here to download upcheck.exe, save it in your main Tracker 7 folder, run it (when Tracker 7 isn't running) then fix any issues the program identifies.
We recommend keeping a copy of Tracker 7 on your computer for at least a year after upgrading so you can look up data that wasn't converted (for example, inactive jobs and the history of items assigned to those jobs).
If you've used Tracker 7 for several years, you probably have old transaction history, jobs, employees and other data you rarely look at. Your Tracker 8 performance will be snappier if you exclude un-needed data from the conversion, for example ...
- In the Tracker 7 jobs and vendors screens, uncheck the ACTIVE column in the jobs and vendors you don't want upgraded.
- in the Tracker 7 storage sites and employees screens, delete the storage sites and employees you don't want upgraded.
- Transaction history at inactive jobs and vendors and deleted storage sites and employees won't be upgraded. But items assigned to inactive jobs and vendors and deleted storage sites and employees will be retained and re-assigned to your default storage site.
Descriptions are much-more important in Tracker 8 than in Tracker 7. There's a lot you can do to make them work better:
- If you use different descriptions for identical items (for example, STEP LADDER and STEPLADDER), edit your Tracker 7 inventory so identical items have identical descriptions.
- Descriptions work best when they identify a reasonably-small group of similar or identical items. If your descriptions are too specific, they may only describe one item (for example, PICKUP 1/2 TON is probably better than 1/2 TON 2015 CHEVY PICKUP).
- Include words people use when asking for an item and exclude the rest (if people mention size when asking for an item, include it in the description; if size isn't mentioned, leave it out).
- Start descriptions with the most generic term then get more-and-more specific (for example, LADDER STEP 8 FT instead of 8 FT STEP LADDER) and your items will group naturally when sorted by description.
Over time, Tracker 7 data can become inconsistent. It's worth checking ...
- Your rates, if you're using the billing system, to make sure identical items have identical rates.
- The inventory and/or job codept field, if you're using either, to make sure you're using that field consistently.
- Your timberline data (the fields to check vary with the way you've set up your Timberline options).
While you can do a physical count and update quantities after upgrading, doing so before gives you an opportunity to check your data and catch inconsistencies.
|
Tracker 7 |
Tracker 8 |
|
|
typical users |
office and warehouse personnel |
office, warehouse and field personnel |
|
field users can use mobile devices to search for and order items |
||
|
installation |
on each computer |
no installation necessary, cloud-based, runs in a browser |
|
on-site server installation possible but not offered initially |
||
|
internet access |
possible with utilities like terminal server or citrix |
standard, runs over the internet |
|
mobile devices |
not supported |
specialized screens for mobile devices |
|
designed to be used by field personnel for searches, orders |
||
|
modules |
employees (optional, extra cost) |
employees (included, no extra cost) |
|
custom reports (optional, extra cost) |
custom reports (included, no extra cost) |
|
|
portable barcode download (optional, extra cost) |
portable barcode download (included, no extra cost) |
|
|
supplies & small tools (optional, extra cost) |
supplies & small tools (optional, extra cost) |
|
|
billing (optional, extra cost) |
billing (optional, extra cost) |
|
|
repair & maintenance (optional, extra cost) |
repair & maintenance (optional, extra cost, available Spring 2017) |
|
|
pricing |
one-time license + annual support fees |
monthly or annual use fees, no up-front license fees |
|
no charge for view-only users |
charge for view-only users |
|
|
ORDER ENTRY |
||
|
mouse & menu on a computer |
works best if the user knows his organization's IDs |
different screen for different users |
|
works reasonably-well if the user knows descriptions |
one for those who know their organization's IDs or descriptions |
|
|
another for those who don't: utilizes a familiar 'add to cart' approach |
||
|
supports separate barcode #s, no other cross-references |
unlimited cross-references, e.g., barcode #s, manufacturer #s |
|
|
touchscreen on a mobile device |
not supported |
specialized screens for mobile device users |
|
stationary barcode on a computer |
supported, data checked when entered |
same |
|
doesn't support separate barcode #s |
supports separate barcode #s |
|
|
portable barcode on a computer |
supported, data not checked until uploaded |
same |
|
barcoding on a mobile device |
not suppported |
supported, data checked when entered |
|
INTERFACE |
grids in Tracker 7 |
similar concept, different name ('views') in Tracker 8 |
|
very limited organization-wide setup |
designed for organization-wide setup |
|
|
user customization |
each user can have a different grid for the same data |
each user can have any number of views of the same data |
|
column widths can be changed but changes aren't saved |
column widths can be changed, changes can be saved |
|
|
organization managers can set up one default grid per table |
can set up one default and any number of alternative views |
|
|
all subsequent changes are user-by-user |
subsequent changes can be by group or user |
|
|
organization managers can change default, re-assign users, etc. |
||
|
table-to-sub-table grids/views |
not supported |
supported |
|
fields from other tables |
cannot be added by users to grids |
can be added by users to grids |
|
can be added to reports |
same |
|
|
searches |
quick 1-column searches |
same |
|
1-column search operator (e.g., 'starts with') can't be changed |
users can pick from a list of operators |
|
|
complicated searches can be saved |
complicated searches must be saved |
|
|
can only search for data in the table being used |
can search for data in related tables |
|
|
organization manager can't pre-define complicated searches |
organization managers can define any number of complicated searches for all users in his organization |
|
|
users can add additional user-specific complicated searches |
||
|
no default search |
organization managers can define default searches for each view |
|
|
users can over-ride that with a user-defined default |
||
|
sorts |
click a column heading to sort ascending, again to sort descending |
same |
|
complicated sorts (2+ columns) not supported |
any number of complicated sorts can be created and saved |
|
|
can include data from related tables in sorts |
||
|
organization managers can define any number of complicated sorts |
||
|
users can add additional user-specific complicated sorts |
||
|
default sorts system-defined, users can't change |
organization managers can define default sorts for each view |
|
|
users can over-ride that with a user-defined default |
||
|
REPORTING |
search results can be passed from a grid to a report |
same |
|
customizing a grid doesn't change reports |
reports generally replicate the columns displayed in a view |
|
|
changing the sort in a grid doesn't change reports |
reports generally replicate the sort order in a view |
|
|
DATA |
items automatically-assigned to default storage when added |
items not automatically-assigned |
|
categories assigned by item |
categories (renamed for clarity and extended) assigned by description |
|
|
unique (including vehicles) |
vehicles, equipment and expensive tools |
|
|
not unique |
inexpensive tools |
|
|
not unique not normally returned |
consumables, serialized consumables and intangibles |
|
|
BILLING |
rates assigned by item |
rates assigned by group |
|
difficult to undo period-end bills and re-run bills for previous periods |
easy to undo period-end bills and re-run bills for previous periods |
|
|
hourly billing from meter entries, only |
hourly billing from meter entries or clock time |
|
|
SECURITY |
||
|
user passwords |
optional if employees module on |
required |
|
security levels |
pre-defined, hard-coded |
pre-defined by group, i.e., more fine-grained |
|
field-level security |
organization managers can exclude fields from grids |
organization managers can define field access by group |
|
TECHNICAL DETAILS |
database, language, interface: Visual FoxPro 6 |
database: postgreSQL |
|
no longer supported by Microsoft but common |
language: javascript |
|
|
Windows only |
development environment: servoy |
|
|
interface: jQuery, jQuery mobile, slickgrid |
||
|
all open-source |
||
|
all operate on multiple operating systems: Windows, Linux, etc. |
Updated January 19, 2023
In US dollars
Subject to change without notice
Upgrading from Tracker 7
Upgrade pricing is described in a different section of this web page: Upgrading from Tracker 7 to 8.
Free Tracker 8 accounts
Sign up here for a free Tracker 8 account. Free accounts have no time limit and offer the same functionality as paid EXCEPT they ...
- Are limited to 250 items
- Can be used by just 1 person at a time (as many people as you like can have sign-in credentials but only 1 can access the system at a time)
- Do not include any of the Tracker's optional modules (described in the Overview section of Tracker 8)
Free account software maintenance, technical support, training
If you have questions, contact us, preferably by email. We'll provide a modest amount of no-charge tech support but reserve the right to charge $40 per quarter hour. Support may be purchased in advance for $150 per hour.
Free Tracker 8 accounts include:
- Access to the most current Tracker 8 release
Paid Tracker 8 accounts
Contact us to upgrade to a paid account. Paid accounts ...
- Can track an unlimited number of items
- Allow more than 1 person to use the Tracker at the same time
- Can run Tracker 8's optional modules
Fees for paid Tracker 8 accounts are paid monthly or annually in advance in US dollars. You can stop using Tracker 8 any time you like but Waterwheel will not refund fees previously paid unless required by law. For additional payment terms, see Waterwheel's Terms of Use.
|
monthly Tracker 8 editing user fees (notes 1 and 2) |
|
editing user 1 (note 3) |
each additional editing user (note 3) |
|
base system |
|
$30/month |
$10/month |
|
optional modules (note 4) |
supplies |
$15/month |
$5/month |
|
|
billing |
$15/month |
$5/month |
|
|
repair |
$15/month |
$5/month |
|
monthly Tracker 8 view-only user fees (notes 1 and 2) |
|
each view-only user (note 3) |
|
base system |
|
$1/month |
|
optional modules (note 4) |
supplies |
$.50/month |
|
|
billing |
$.50/month |
|
|
repair |
$.50/month |
- Note 1. Editing users can add and edit data. View-only users can order items but cannot otherwise add or edit data.
- Note 2. Annual fees are discounted 10% compared with monthly fees.
- Note 3. Any number of people in your organization can have Tracker 8 user id's and passwords but the number who can sign in at the same time is limited to the number you're paying for.
- Note 4. All users in an organization must license the same optional modules.
Paid account software maintenance, technical support, training, user customization and custom code
If you have questions, contact us.
Tracker 8's paid account fees include:
- Access to the most current Tracker 8 release
- Technical support by email or, when we're available, phone (we're normally available during California business hours)
Tracker 8 fees do not include:
- Training (for which we charge $150 per hour plus travel expenses, if on-site)
- Custom code
You can customize Tracker 8 screens, reports, searches and sorts yourself using the customization utilities built into Tracker 8.
If a feature you want isn't available in Tracker 8, we can add it for you by writing custom code. Before proceeding with a project, we will discuss its scope and our fees with you. At your request, we'll document that scope and those fees in a letter or contract. In all cases, Waterwheel will retain ownership of and Intellectual Property Rights to any code written on your behalf. You agree that Waterwheel may incorporate all such code in Tracker 8 as it sees fit.
Barcode hardware
|
portable Worth Data LT5001H TriCoder with integrated laser scanner, usb cable and handle |
$799 |
|
portable Worth Data LT5001 TriCoder with integrated laser scanner and usb cable but without handle |
$699 |
|
portable reader standard programming, each (custom programming at standard custom code rates) |
$50 |
|
portable reader shipping |
cost |
|
|
|
|
stationary LZ360-USB laser scanner with usb cable |
$219 |
|
stationary LZ400RF 2-way radio laser scanner including 1 base station and usb cable |
$999 |