Tracker 8 help - Preferences
Every user has his or her own user preferences. Click the Utilities icon in the main menu then Preferences to see and edit them.
If you're an organization manager, the Preferences screen will open with Task preferences displayed. To see your user preferences, click the User Preferences tab.

- Language, for example, English.
- Variant of the selected language, for example, US English.
- Date format, set by the system based your language and language variant.
- Rows per page, 50 by default. Breaking data into pages improves system performance by retrieving just a page of data at a time. A few screens aren't affected by this setting (find and add to order, cart, count or verify, imports, alerts).
- Default screen, the screen that opens when you first sign into Tracker 8.
- Default site id, identifies your personal default site, over-riding the organization default site set by an organization manager, used when barcode data is imported from a portable scanner.
- Portrait print all quick reports forces quick (but not saved or special purpose) reports into portrait format. If unchecked, wide reports print landscape.
- Use smart phone or tablet camera for scanner adds scanning buttons to the Fast add to cart and Count or verify screens when the Tracker is running on a smart phone or tablet. A barcode scanning app must also be installed.
- Barcode label size in inches. Used when printing barcode label reports from the codes, employees, items, jobs, storage sites, sub locations and vendors screens.
- Ask for confirmation for quantity unavailable prompts the user if he or she tries to take more of an item from an assignment than is shown there.
- Ask for confirmation for unsaved data prompts the user if he or she tries to move away from a screen that contains unsaved data.
Only organization managers can see and edit task preferences.

Check the tasks you want users to be able to pick from in Cart tasks. You can, for example, allow your users to purchase for storage sites and jobs but not for employees or items. Or you can disallow purchasing altogether.
All users see the same task list.
Only organization managers can see and edit secondary assignment preferences.

Tracker 8 allows you to assign items to primary and secondary assignments at the same time, for example, to a job and employee. Primary assignments are listed in bold on the left, for example, Storage site. The secondary assignments that are available for each primary assignment are listed in italics under and slightly to the right of each primary assignment, for example, Employee.
Only one secondary assignment can be selected for each primary assignment.
To the right of each sub_assignment ...
- N/A means not applicable or not used.
- To optional means the user can leave the secondary assignment blank when specifying where an order is going.
- To required means the user must enter a secondary assignment when specifying where an order is going.
- From optional / To optional means the user can leave the secondary assignment blank when specifying where an order is going or where the items in that order are coming from.
- From optional / To required means the user must enter a secondary assignment when specifying where an order is going but can leave it blank when specifying where the items in that order are coming from.
Only organization managers can see and edit billing preferences.

- Billing method specifies the arithmetic used when computing bills. Current = this period only (the default) only considers transactions in the period between the billing COMMENCE and COMPLETE dates entered by the user. Previous charges aren't considered for upgrades, maximums, or any other purpose. Credits (other than sale refunds) must be hand-entered. Current = total - previous is the approach used in Tracker 7: the system computes the total amount due for every item from when it was first sent then subtracts the amount charged previously on PERIOD COMPLETE bills. Most credits are computed automatically.
- Tracker 8 always calculates bills for jobs. Bill employees figures bills for items assigned to employees. Bill items, for items assigned to other items.
- Job default code takes precedence over rate type code. Pre-set (or default) codes can be set up in jobs or rate types. If there's a conflict and this option is checked, the job code is used. If not checked, the rate type code is used.
- Job default max rent takes precedence over rate type max rent. Max rent can be set in jobs or rate types (or this preference screen). If there's a conflict between the job and rate type max rent and this option is checked, the job max rent is used. If not checked, the rate type max rent is used.
- Default rate schedule. Used if a job isn't assigned a rate schedule. Also used with employees and items, if you choose to bill them. Not required but recommended. Enter a Default rate schedule and you'll only need to enter exceptions in your jobs.
- Bill period. Bill calculated usage figures usage between the COMMENCE and COMPLETE dates entered by the user (considering any holidays entered by the user and weekends if week length is set to 5 in organization preferences). Items out for an entire month can be billed more or less than the month rate, depending on the number of days in the month, holidays and weekend. Bill for exactly one month requires the COMMENCE and COMPLETE dates to be the first and last day of a month. Items out for an entire month are charged the month rate, exactly.
- Default max rent, a percentage of cost, is used if no max rent has been entered in the relevant job or rate type. If you want to cap your rentals, enter a Default max rent and you'll only need to enter exceptions in your jobs and/or rate types. Be sure to enter a cost for all the items whose rentals you want to cap!
- Default refund, a percentage of the sale price charged, is used if no refund has been entered in an item's rate type. If you want to issue a refund when sold items are returned, enter a Default refund and you'll only need to enter exceptions in your rate types.
- Hour start time is used to figure hours of use for assignments (not meter readings) if an items default rate period is HOUR.
- When you're entering rates, the Tracker automatically cross-calculates hour, day, week and month rates if all 4 fields are blank and you've entered day, week and/or month breaks. A rate break is an upgrade point. If an item's hour rate is $1 and its day rate is $6, its Day break is 6 hours: if the item is out less than 6 hours, the hour rate is a better deal than the day rate; if out more than 6 hours, the day rate is a better. The Day break is in hours, the Week break in days and the Month break in weeks. If your Day break is 6, Week break 4, and Month break 3 and the user enters $6 as the day rate, the Tracker will cross-calculate a $1 hour rate ($6 / 6), $24 week rate ($6 x 4) and $72 month rate (3 x the $24 week rate). It doesn't matter which of the 4 rates is entered, the other 3 will be cross-calculated.
- Bill repair and maintenance (repair and maintenance module required) bills jobs for repair and maintenance work.
- Bill meter hours (repair and maintenance module required) bills jobs for meter hours.
Only organization managers can see and edit notification preferences.

- Email the users selected below when an order is placed. Select more than one user using the standard techniques for your device, for example, in Windows, click one user then hold down the Ctrl key and click a second user.
- Email the person who created an order when that order is changed. When, for example, the order is shipped. No email is sent if the order is changed by the person who created it.
- Email upon item alert. The alert date, message and email addresses are entered in the Items screen.
- Email the users selected below upon maintenance due alert.
- Email the users selected below when an order point is reached.
Only organization managers can see and edit organization preferences.
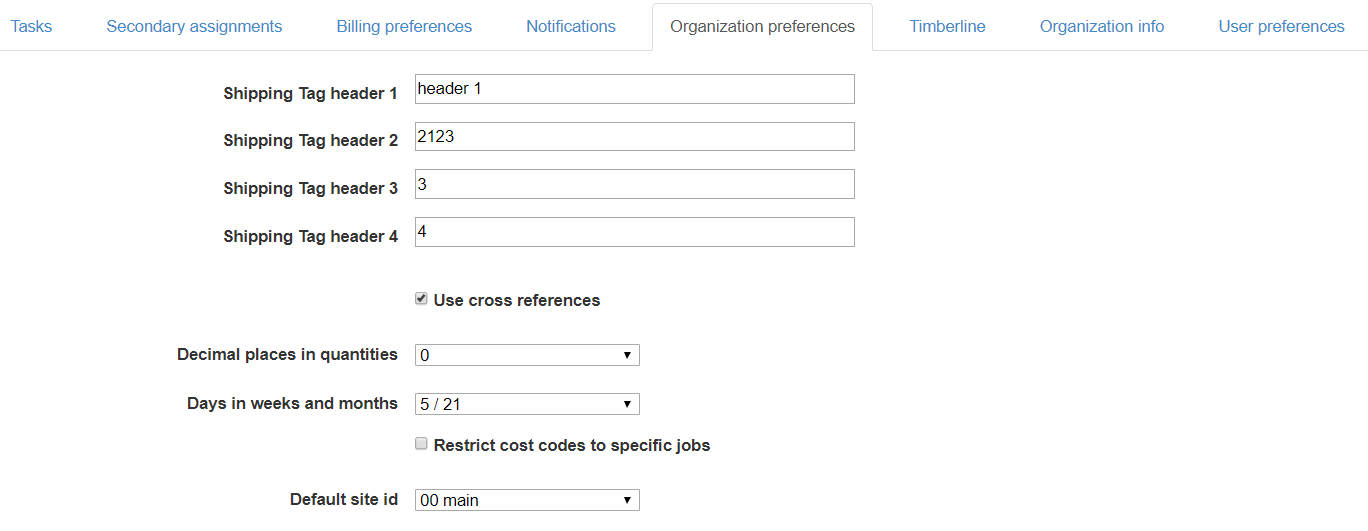
- Shipping tag header 1 - 4 prints in the upper left corner of a Shipping Tag report (run from the Orders screen). Shipping tags list the items in an order. Could be called a 'packing list' or 'bill of lading.'
- Use cross references allows more than one number to refer to the same item, for example, manufacturer numbers or externally-printed barcode labels. See cross references.
- Decimal places in quantities. For organizations that use fractional quantities, for example, 1/2 ton.
- Days in weeks and months. Used when calculating usage, primarily in billing. Either 5 days per week / 21 days per month or 7 days per week / 30 days per month.
- Restrict cost codes to specific jobs.Restricts the codes available in drop down lists to those associated with each job in the Jobs screen (in the 'with codes' view).
- Default site id, identifies your organization's default site (which is over-ridden if a user specifies a default site id in his or her User preferences), used when barcode data is imported from a portable scanner.
Only organization managers can see and edit Timberline preferences.
If you have the Tracker Billing module and Timberline job cost and want to export your Tracker bills to Timberline ...
- Set up Tracker views and Timberline preferences that match the options you've chosen in Timberline job cost.
- Enter or import your data.
- Run a Timberline report from the bill details grid with the Export CSV option.
- Import the exported data into Timberline.

- Category source. The revenue code in the item's rate type (included in the 'Rate schedules rate types' grid's Timberline view) or the revenue code in the job the item is assigned to.
- Default category. The category used if no other category is identified.
- Cost code source. Either the code recorded when the item was assigned or the cost type from the item's rate type (included in the 'Rate schedules rate types' grid's Timberline view).
- Default cost code. The cost code used if no other cost code is identified.
- Default account prefix. The account prefix used if no other prefix is identified.
- Use job billcode as prefix.
- Default debit account. The debit account used if no other account is identified.
- Debit account source: cost code, category, job debit account, or none.
- If cost code or category is the debit account source, the debit account is taken from the GROUP A, GROUP B or GROUP C field in the Codes screen. The group is specified in the JOB GROUP field in the Jobs screen (GROUP A is used if no 'job group' is specified).
- If job debit account is the debit account source, the debit account is taken from the DEBIT ACCOUNT field in the Jobs screen.
- Select the fourth option (none) if the "Don't allow override" of cost account option is checked in Timberline. No debit account will be included in the output file.
- Default credit account. The credit account used if no other account is identified.
- Number of characters sent as Job ID and Characters sent as Extra ID. You can split the Tracker job number into 2 pieces. The number of characters entered in the first field is sent as the job id. The remaining characters are the job extra.
Export file format
Billing data is exported from Tracker 8 to Timberline in a comma-delimited file with double quotes around strings. You can examine the file with a word processor or spreadsheet. Each line contains the following columns in the order listed:
- Always 'DC.'
- The first 'Number of characters sent as Job ID' of the job number, as defined in Timberline preferences.
- The Extra ID defined in Timberline preferences.
- Either costtype from the Tracker inventory file or dept from the Tracker history file as selected in Timberline preferences. If both are blank, the Default cost code from Timberline preferences.
- If Using categories is checked in Timberline preferences, revcode from the Tracker inventory file. If blank, the Default category from Timberline preferences.
- Always 4.
- Begindate from the Tracker history file.
- The Accounting date entered when a Timberline report is run from the billing details grid.
- Id plus the first 20 characters of the description from the Tracker inventory file.
- Quantity from the Tracker history file.
- Rate from the Tracker history file.
- Amount due from the Tracker history file.
- The debit account defined in Timberline preferences.
- If Standard, the Default credit account from Timberline preferences. If Extended and Use job billcode as debit acct prefix is checked, the billcode from the Tracker job file is inserted before the Default credit account.
Import billing data into Timberline
- Open Timberline Job Cost.
- Select JC: Tools / Import / Direct Costs... If a message box appears stating, "The JC New Transaction file was not found. The file will be created", click to continue. If you are using named files (Extended only), enter the name of the new JCT file you wish to store the imported entries in.
- With the cursor in the Import file field, click on the button marked '...' and select the file that was created by the Tracker software. This file will have a ".JCD" file extension.
- Push START. The file will be imported in the background. To check the progress at any time, select JC: Tools / Background Tasks...
Handling Rejected Records
The Import Direct Costs function could reject entries if data fields in the file contain invalid values. This could be invalid Jobs, Cost Codes, Categories, or GL accounts. Entries could also be rejected if they have an accounting date that is beyond the next month in Job Cost or are for a closed General Ledger period. If periods (such as weekly or semi-monthly) are used in Job Cost, entries that have an accounting date beyond the current period end date will be rejected.
If none of the data from an import file is imported, you have the option to address the problem by re-creating the file from its source (Tracker) and attempting the process again.
The JCD file may be edited using a standard text editor (such as Notepad or Wordpad) if needed to correct any invalid values.
If entries are rejected ...
- Address the reason for the rejection. Make the correction in Timberline (e.g., if the job was not setup yet in Timberline) or correct the JCREJECT.JCD file.
- Follow the steps outlined for Importing Data except, in the Import file field, enter the name of the rejected records file (from the last import). In the Rejected records file field, enter a new name such as JCREJECTx.JCD (where x is a number).
Continue handling any remaining rejections in this manner by first addressing the reason for the rejection and then importing the rejected records file using a new file name for the new rejected records file. The example below shows how Import Direct Costs was used three times before all entries were finally imported.
| Import file | Rejected records file | Result |
| T6DATA.JCD | JCREJECT.JCD | 2 entries rejected due to job that was entered in Tracker and not setup in Timberline. Solution was to setup the jobs in Timberline. |
| JCREJECT.JCD | JCREJECT2.JCD | 1 entry rejected due to a GL debit account that was not setup. Solution was to edit the file in Notepad. |
| JCREJECT2.JCD | JCREJECT3.JCD | No entries rejected (JCREJECT3.JCD is empty) |
Important Considerations about Importing Direct Costs
- The file that is imported does not get removed or renamed by Timberline.
- DO NOT re-import the same file more than once. This will result in duplicated entries.
- Depending on your Post and Interface Settings in JC Settings, imported entries may need to be posted.
- When Direct Costs are imported and posted in Job Cost, entries will be created for General Ledger (assuming the interface and create-entries controls are active). The entries created for General Ledger may need to be posted before the GL account balances will be affected.
Only organization managers can see and edit organization info.

Address and contact information used in reports, for example, the Purchase Order report (run from the Orders screen).
- Logo. The image file you select (by clicking Choose file) is displayed in some reports.
- Legal language for POs appears on purchase orders