Tracker 8 help - Rates
Including rate schedules and rate types (only available with the optional billing module)
The Tracker records pre-set rental and sale rates automatically in item history as items are shipped to jobs.
Setting up pre-set rental rates that automatically upgrade from day to week to month is easy. You control when and whether an item upgrades from one rate to the next.
You can enter an exception rate for a specific transaction as an order is entered or later, in the Item History screen. Entering an exception rate doesn't change your pre-set rates. The opposite is also true: changing pre-set rates doesn't change rates previously recorded in item history.
Tracker rates offer many additional options, including rental minimums (or defaults), maximums, sale refunds and transaction codes.
- A rental minimum is the rate period used by default when an item is assigned. If, for example, you want to charge a minimum of 1 week's rent for an item, set it's default rate to 'Week.'
- A rental maximum is the rental cap for an item on one assignment, expressed as a percentage of that item's cost. Maximum rents can also be set as a global default (in billing preferences) or by job. See bills for more detail.
- A sale refund is the percentage of a sold item's sale rate to be refunded when the item is returned.
- Transaction codes are most-often used when Tracker billing data is exported to an accounting system, where such codes can be called cost codes, categories, departments, and other names.
Pre-set rates are are stored in several tables. Your pre-set rates are stored in 'rate schedules rate types.'
|
rate type |
day rate |
week rate |
month rate |
sale rate |
default |
|
type A |
$1.00 |
$4.00 |
$12.00 |
$0.00 |
day |
|
type B |
$2.00 |
$8.00 |
$24.00 |
$0.00 |
week |
Items with the same rates are grouped into rate types. This makes it easy to edit groups of items quickly. If, for example, all your hand drills use rate type HAND DRILL, you only need to edit one rate type to change the rates for all your hand drills. In the sample rate type table below, items A and AA have the same rate type (which means they have the same rates).
|
item number |
rate type |
|
item A |
rate type A |
|
item AA |
rate type A |
|
item B |
rate type B |
If you want to charge all your jobs the same rates (with occasional exceptions), you don't need to concern yourself with rate schedules. But if you want to charge different jobs different rates, you'll need to add one or more rate schedules, each containing a list of rates used by one or more jobs.
Rate schedules and types can be imported.
NAME YOUR RATE TYPES
Items with the same description often have the same rates. And rate types named by description are easy to understand and use. We therefore recommend using descriptions to name your rate types. If items with different descriptions have the same rates, you'll have rate types with identical rates. But that's a small price to pay for the clarity and ease-of-use this approach to rate type names provides.
If some of your items have the same description but different rates, you can still use those items' descriptions as their rate type names by modifying them slightly. If, for example, you've used the same description (COMPRESSOR) for all compressors, regardless of their size, add size or some other identifying information to your compressors' description when naming your rate types (COMPRESSOR 50 CFM, COMPRESSOR 100 CFM).
ADD PRE-SET RATES AND ASSIGN THEM TO ITEMS IN THE NEW OR DUPLICATE ITEM WIZARD
The easiest way add pre-set rates and assign them to items.
- Click the Data icon in the main menu then Items.
- If you want to duplicate an existing item, select that item in the Items grid.
- Click the Tools icon in the grid menu, Macros then either Duplicate item wizard or New item wizard.
- If your organization has licensed the Tracker billing module, the wizard's third screen will ask you to specify the new item's rates.
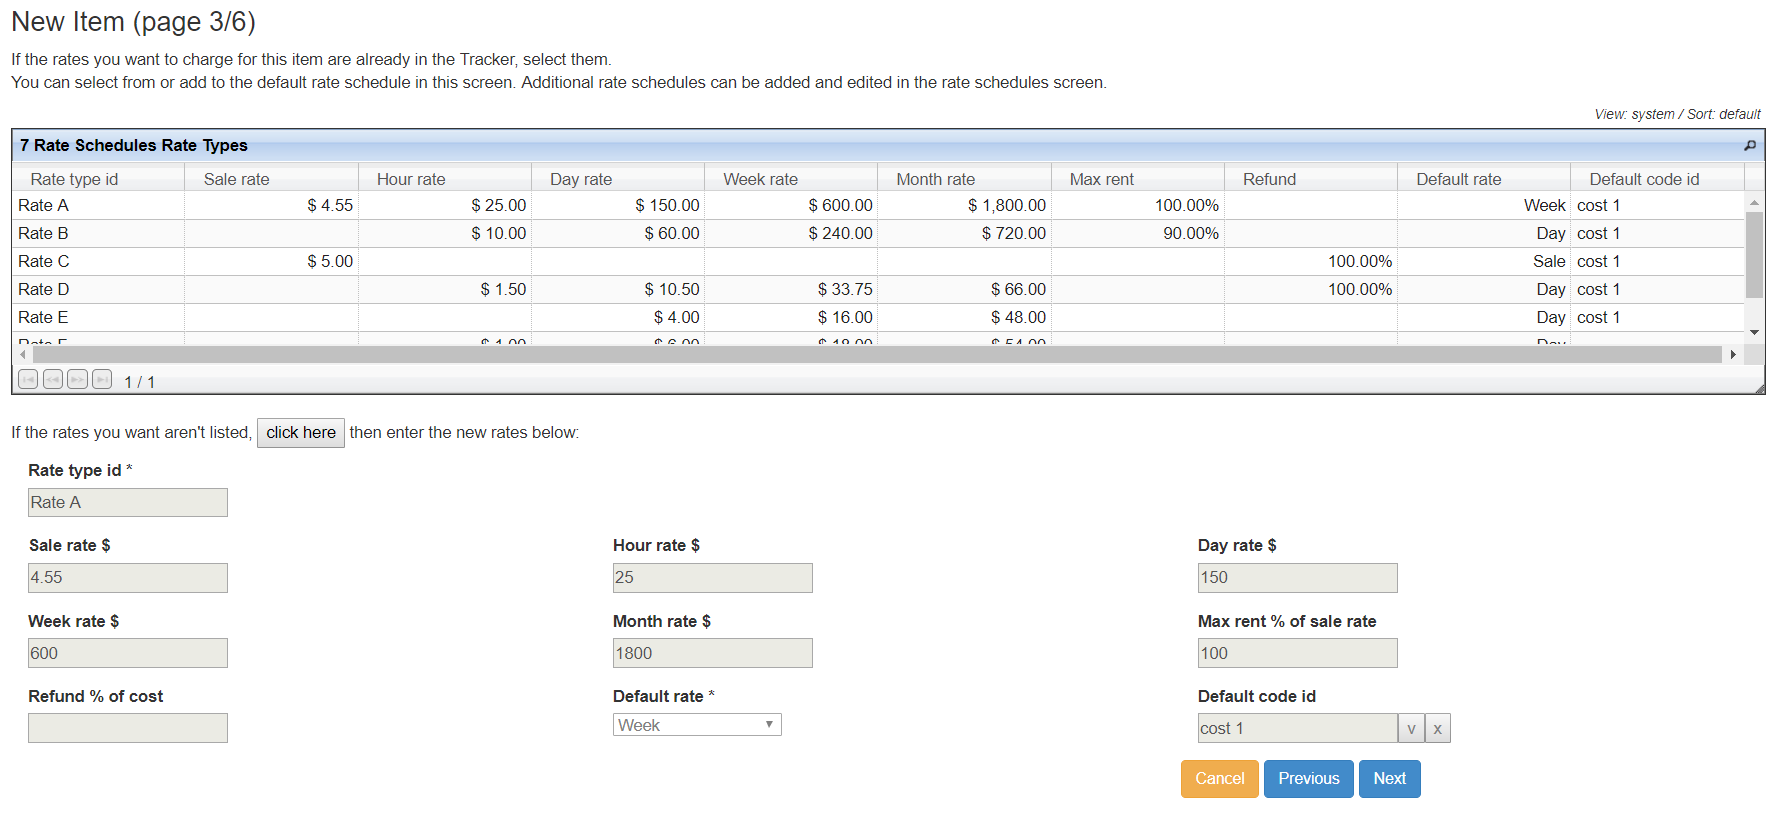
- If you're duplicating an item, that item's rates will appear in the lower part of the screen. You can select a different rate type in the Rate Schedules Rate Types grid. If the rates you want aren't listed or you want to add a new rate type, click the click here button and enter your new rate type and rates in the lower part of the screen.
Limitation of the new or duplicate item wizard:
- While you could use the wizard to examine existing rates, there are easier ways, described below.
- Existing rates can't be edited in the wizard.
- If you want to assign different rates to different jobs, you'll need to add the alternative rates in other screens. But if you want to use the same rates with all your jobs, you don't need to do anything more unless or until you want to edit the rates entered in the new or duplicate item wizard.
EXAMINE AND EDIT PRE-SET RATES
- To examine an item's pre-set rates, click the Data icon in the main menu then Items.
- If Rate Schedules Rate Types aren't displayed in the subgrid, click the Tools icon in the grid menu, Views then lists alerts rates.
- In the main grid, scroll to or search for the item(s) you want to examine or edit.
- To edit an item's rates, click the Edit icon in the subgrid menu. Changing rates in the Rate Schedule Rate Types subgrid changes the rates for all the items that share the rate type you edit.
- Click the Save icon in the subgrid menu.
- To see a list of items that have the same rate type, click the Data icon in the main menu then Rate types.
- If Items aren't displayed in the subgrid, click the Tools icon in the grid menu, Views then with items.
- In the main grid, scroll to or search for the rate type(s) you want to examine.
EDIT PRE-SET RATES IN THE RATE CHANGE WIZARD
- Backup before running the rate change wizard, which can change many records with a single click.
- Click the Data icon in the main menu then Rate types or Rate schedules.
- If the view that appears doesn't include a "Rate Schedules Rate Types" subgrid, click the Tools icon in the main grid menu, then Views then with rates.
- Select at least one rate schedule or rate type in the main grid. You can select more than one by clicking the check boxes in the left-hand margin. All the rate schedules rate types associated with the selected rate schedules or types will be displayed in the subgrid.
- Optionally, select one or more rate_schedules_rate_types in the subgrid by clicking the check boxes in the left-hand margin. Only the selected rate schedules rate types will be affected by the rate change wizard. If you want to run the rate change wizard for all the displayed rate schedules rate types, either don't select any of them or select them all.
- Click the Tools icon in the "Rate Schedules Rate Types" subgrid menu, then Macros then Rate Change Wizard.

- You can change rates in several ways.
- $ value. Changes a rate to a specific dollar value.
- % cost. Changes a rate to a percentage of the item's cost. If one or more of the selected rate schedules rate types are used by items with different costs (or if some have costs and others don't), the wizard will display a warning without changing any rates.
- % current rate. Changes a rate to a percentage of its current rate.
- breaks. A break is an upgrade point. If an item's hour rate is $1 and its day rate is $6, its Day break is 6 hours: if the item is out 6 or fewer hours, the hour rate is a better deal than the day rate; if out more than 6 hours, the day rate is a better deal. The Day break is expressed in hours, the Week break in days and the Month break in weeks.
- If you enter a break in the rate change wizard, the Tracker will calculate new rates based on the existing, old rates. For example, if a rate schedule rate type currently has a day rate of $10 and a week rate of $40 and you enter a new day rate of $12 in the $ value field and a new break for the week rate of 3 days, the newly-computed week rate will be $30 (3 * the old day rate), not $36 (3 * the new day rate).
- Your organization's default day, week and month breaks are entered by your Tracker 8 organization manager in the billing preferences screen and are displayed in parentheses to the right of each break field.
- If the hour, day, week and month rates are all blank and you enter an hour, day, week or month rate in the rate schedules rate types grid or rate change wizard, the Tracker will use your organization's default breaks to automatically cross-calculate hour, day, week and month rates.
- You can mix and match $ value, % cost, % current value and breaks when calculating new rates, for example, basing the day rate on a dollar value and the week rate on a percentage of the current rate. But you can't use more than one approach with the same rate at the same time. You can't, for example, change the day rate to both a dollar value and a percentage of the current rate.
- You don't need to change every rate when you use the wizard. You can, for example, change just the sale rate (or just the day and week rates, or any other combination).
ADD PRE-SET RATES
- Click the Data icon in the main menu then Rate types.
- If Rate Schedules Rate Types aren't displayed in the subgrid, click the Tools icon in the grid menu, Views then with rates.
- Click the Add icon in the main grid menu.
- Enter a rate type name then click the Save icon in the main grid menu.
- Click the Add icon in the subgrid menu.
- Enter the rates you want for this rate type then click the Save icon in the subgrid menu.
SET UP PRE-SET RATES THAT WON'T UPGRADE
You control when and whether an item upgrades from the day to the week then the month rate. The upgrade occurs when it's a better deal. If, for example, an item's day rate is $1 and its week rate is $3, it will upgrade to the week rate on the 4th day (not on the 3d day, when the week rate isn't a better deal). If the week rate is $5 and you're using a 5-day week, the item won't ever upgrade from the day to the week rate.
ASSIGN PRE-SET RATES TO ITEMS
- Click the Data icon in the main menu then Items.
- If the view that appears doesn't include the RATE TYPE ID column, click the Tools icon in the main grid menu, then Views then lists alerts rates.
- Scroll to or search for the item you want to edit. Click the Edit icon in the main grid menu then the RATE TYPE ID field. Select a rate type.
- Click the Save icon in the subgrid menu.
ENTER AN EXCEPTION RATE WHEN ASSIGNING AN ITEM (in the Orders - assignments screen)
Changing a rate in the Orders - assignments screen doesn't change the item's pre-set rates.
- If the subgrid view doesn't include the RATE column, click the Tools icon in the main grid menu, then Views then system.
- Scroll to or search for the item you want to edit. Click the Edit icon in the subgrid menu then edit the RATE field.
- Click the Save icon in the subgrid menu.
The Details grid System view includes just the RATE field. It doesn't include RATE PERIOD, MAX RENT and a number of other rate-related fields. If you want to edit one or more of those in the Orders - assignments screen, create a view that includes them.
ENTER AN EXCEPTION RATE IN ITEM HISTORY
Changing a rate in item history doesn't change the item's pre-set rates.
- Click the Data icon in the main menu then Item history (details) .
- If the view that appears doesn't include the rate fields you want to edit, click the Tools icon in the main grid menu, then Views then item history.
- Scroll to or search for the item you want to edit. Click the Edit icon in the main grid menu then the field(s) you want to edit.
- Click the Save icon in the subgrid menu.
SET UP DIFFERENT PRE-SET RATES FOR DIFFERENT JOBS
If you want to charge all your jobs the same rates (with occasional exceptions), you don't need to concern yourself with rate schedules. But if you want to charge different jobs different rates, you'll need to add one or more rate schedules, each containing a list of rates used by one or more jobs. In this example, rate schedule 1 is assigned to job 1, rate schedule 2 to jobs 2 and 3.
|
job |
rate schedule |
|
job 1 |
Schedule 1 |
|
job 2 |
Schedule 2 |
|
job 3 |
Schedule 2 |
The same rate type can be given different rates in different rate schedules. In this example, rate schedule 2 includes a 25% discount for rate type A but no discount for rate type B.
|
rate schedule |
rate type |
day rate |
week rate |
month rate |
sale rate |
default |
|
Schedule 1 |
type A |
$1.00 |
$4.00 |
$12.00 |
$0.00 |
day |
|
Schedule 1 |
type B |
$2.00 |
$8.00 |
$24.00 |
$0.00 |
week |
|
Schedule 2 |
type A |
$0.75 |
$3.00 |
$9.00 |
$0.00 |
week |
|
Schedule 2 |
type B |
$2.00 |
$8.00 |
$24.00 |
$0.00 |
week |
EXAMINE AND EDIT RATE SCHEDULES
- To examine your rate schedules and the rates associated with each, click the Data icon in the main menu then Rate schedules.
- If Rate Schedules Rate Types aren't displayed in the subgrid, click the Tools icon in the grid menu, Views then system.
- In the main grid, scroll to or search for the rate schedule(s) you want to examine.
- To edit a rate schedule's rates, click the Edit icon in the subgrid menu.
- Click the Save icon in the subgrid menu.
ADD A RATE SCHEDULE AND ASSIGN RATE TYPES TO THAT SCHEDULE
If you want to assign different pre-set rates to different jobs, you need to add one or more rate schedules.
- Click the Data icon in the main menu then Rate schedules.
- The easiest way to add a rate schedule and assign rate types to that schedule is to duplicate an existing rate schedule. Click on the schedule you want to duplicate, the Tools icon in the main grid menu, Macros then Duplicate rate Schedule. Edit the new rate schedule's name in the main gri and the rates you want to change in the subgrid.
- To manually add a new rate schedule, click the Add icon in the main grid menu.
- Enter a name for the rate schedule.
- Click the Save icon in the main grid menu.
- To add a rate type to a rate schedule, click the Add icon in the subgrid menu.
- Click RATE TYPE ID, select a rate type, and enter the rates you want this rate schedule to use with this rate type.
- Click the Save icon in the subgrid menu.
ASSIGN RATE SCHEDULES TO JOBS
You only need to assign rate schedules to jobs that do not use the default rate schedule.
- Click the Data icon in the main menu then Jobs.
- If the view that appears doesn't include the RATE SCHEDULE ID column, click the Tools icon in the main grid menu, then Views then system.
- Scroll to or search for the job you want to edit. Click the Edit icon in the main grid menu then the RATE SCHEDULE ID field. Select a rate schedule.
- Click the Save icon in the subgrid menu.
CHANGE THE DEFAULT RATE SCHEDULE
To change the default rate schedule, you must be an organization manager.
- Click the Utilities icon in the main menu, Preferences then Billing preferences.
- Enter a DEFAULT RATE SCHEDULE and click Save in the lower right. The default rate schedule is used if a job has no rate schedule assigned to it.
TABLE STRUCTURE
If you're creating rate views, sorts, searches or reports, you'll need to know how the Tracker's rate tables relate to each other.
'>' in the top row stands for 'many-to-one,' '<' for 'one-to-many' (defined in relations).
|
jobs |
> |
rate schedules |
< |
rate schedules rate types |
> |
rate types |
< |
items |
|
Job1: Schedule1 |
Schedule1 |
Schedule1TypeA: $1/day |
TypeA |
ItemA: TypeA |
||||
|
Job11: Schedule1 |
Schedule2 |
Schedule1TypeB: $2/day |
TypeB |
ItemAA: TypeA |
||||
|
Job111: Schedule1 |
Schedule1TypeC: $3/day |
TypeC |
ItemB: TypeB |
|||||
|
Job2: Schedule2 |
Schedule2TypeA: $1.10/day |
|||||||
|
Schedule2TypeB: $1.90/day |
||||||||
|
Schedule2TypeC: $3/day |
FIELDS
- (Rate schedules grid) RATE SCHEDULE NAME.
- (Rate schedules rate types grid) COST TYPE ID, DEFAULT CODE ID and REVENUE CODE ID are codes. DEFAULT CODEs are pre-sets (see rates) that are entered automatically as items are assigned. COST TYPE and REVENUE CODES are uncommon codes used with specific accounting systems.
- (Rate schedules rate types grid) HOUR RATE, DAY RATE, WEEK RATE, MONTH RATE, SALE RATE, DEFAULT RATE, MAX RENT and REFUND are described in rates.
- (Rate schedules rate types grid) RATE SCHEDULE ID and RATE TYPE ID. The rate schedule and type this rate schedule rate type points to.
- (Rate types grid) RATE TYPE NAME.
MACROS
- (Rate schedules grid) DUPLICATE RATE SCHEDULE. Duplicates an existing rate schedule.
- (Rate schedule rate types grid) RATE CHANGE WIZARD. Changes one or many pre-set rates.
SYSTEM VIEWS WITH RATES IN A SUBGRID
- In the Descriptions screen, the with items view displays, in the subgrid, each item's rate schedules rate types.
- In the Items screen, the lists alerts rates view displays, in the subgrid, each item's rate schedules rate types.
- In the Rate schedules screen, the system view displays, in the subgrid, each rate schedule's rate schedules rate types.
- In the Rate types screen, the with items view displays, in the subgrid, each rate type's items. The with rates view displays, in the subgrid, each rate type's rate schedules rate types.